2017 June 26
Observing the Sun
 Before we look at the basics of solar observing, first a warning: one you have no doubt heard many times before but it is always worth remembering before each observing session.
| The Sun is a dangerous object to observe. Do not look at the Sun directly either through a telescope or with the unprotected naked eye. Any mistake can result in serious damage to your eyesight, so do not take any chances and always think about what you are doing. |
If you have ever let your hand stray behind the eyepiece while projecting the Sun, you’ll know that it’s a mistake not to repeat!
White Light Observing
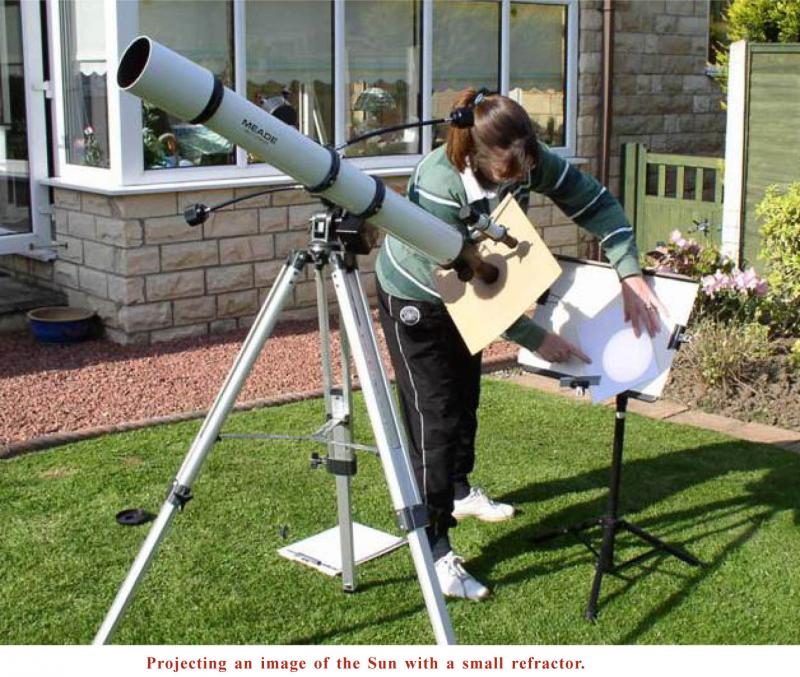
The safest method of solar observing is to project the image through a small telescope onto a piece of white card, and then to visually view the solar image on the card. This method is also the easiest way to record the positions of sunspots on the solar disk. You can observe the Sun by directly looking through a telescope, but you must fit a secure, undamaged solar filter over the object end of the telescope first. Never use an eyepiece that purports to be a solar filter, as these can shatter and the solar image will instantly burn out your retina leaving you permanently blinded in that eye.
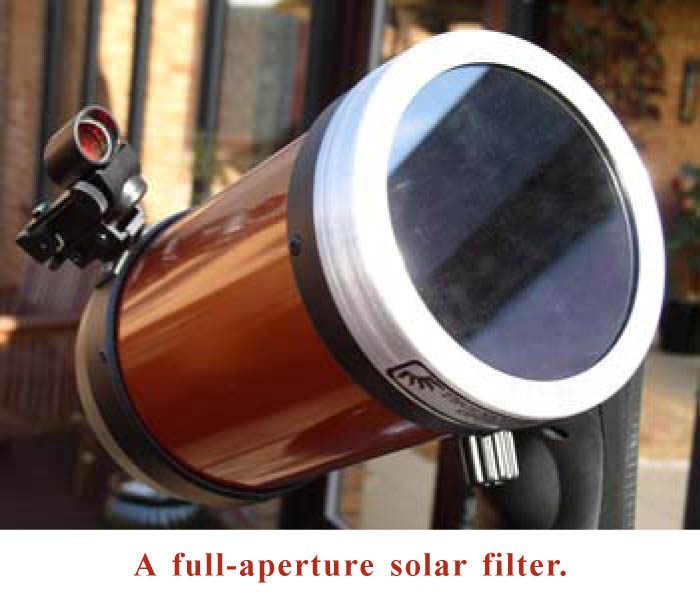 The advantage of directly viewing the Sun over projection is that you will see more detail and have a much clearer view of the sunspot groups. Whenever you view the Sun directly using a solar filter on the telescope, always keep the dust cap on the finder to prevent someone accidentally looking through it or the image falling where it could do damage or even start a fire.
A simple sunspot count
To find the Sun initially, leave the dust cap on the telescope and point the ’scope at the Sun. Then hold a piece of white card behind the eyepiece and move the telescope around a little until the shadow of the telescope is small and rounded on the piece of card. Then remove the dust cap and the solar image can usually be seen projected onto the card held directly behind the ’scope, and you will notice (from a distance!) the bright circular image of the Sun in the eyepiece. This is the time for caution and to get the solar filter into place quickly. Place the solar filter over the object end of the telescope before looking through the eyepiece. Only when satisfied that it is absolutely safe should you look through the eyepiece and view the solar image directly.
Now the work to chart the sunspots begins. Draw a 6-inch (150mm) circle on some plain paper and draw in the groups and the detail of the spots as they appear on the Sun. Remember your telescope may invert the image so south is top. Once you have accurately charted the groups, count the groups and then all the spots within them. If groups are more than 10 degrees apart on the solar surface then they are counted as individual groups.
Let us say that you count 3 groups consisting of 3 spots in the first group, 8 spots in the second group and 1 spot in the third group. You now have 3 groups, and 12 spots. To record the sunspot number for the day you need to multiply the number of groups by a factor of ten, i.e. 30, and add it to the number of spots recorded i.e. 12, giving a total of 42 which is the sunspot number referred to as ‘R’. This is a simple sunspot count and can be achieved daily in minutes.
Charting the sunspots
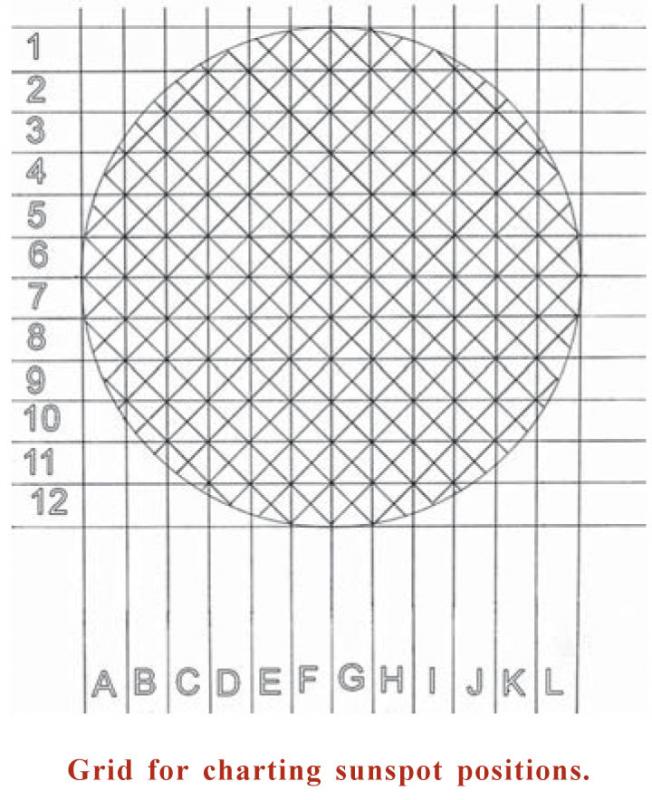 If you want to go further and record the positions of spots then you will probably need to project the image. The best type of telescope for this job is a small refractor. Ideally you need to attach a box or a holder to carry the solar projection, but a music stand placed behind the telescope can do the same job, although you will have to screen the end of the telescope so that the image of the Sun is in slight shade so you can see it in bright daylight. Draw a 6-inch circle on to thin unlined drawing paper or tracing paper and attach that over a grid which will make the charting of the sunspots more accurate.
Again point the refractor roughly in the direction of the Sun, leave the dust cap on and go through the same procedure as outlined above to find the Sun. When you have the Sun’s image projected onto the white card, caution anyone with you not to look through the eyepiece and take care not to leave the telescope unattended during the observation just in case someone is tempted. You may have to adjust the position of the stand so that the solar image completely fits the 6-inch circle you have drawn.
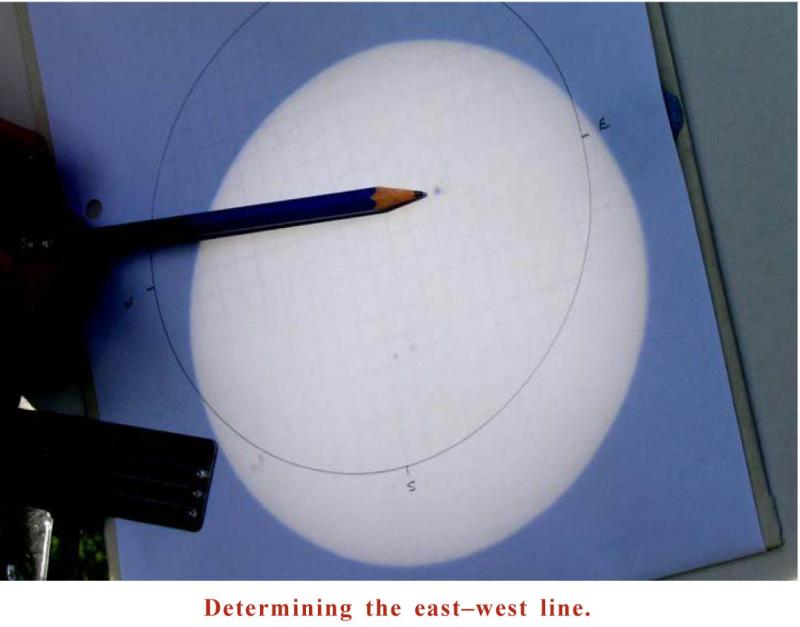
Now you need to establish the direction of the solar equator. Allow a small sunspot to drift along an east-west line of the grid. Adjust the position of the drawing to match the drift of the spot. When the spot drifts accurately from the centre of the drawing to the edge along the east-west line, then you have the image correctly aligned.
Now refit the solar image to the circle you have drawn and chart the groups accurately. You will have to readjust the image several times to chart the positions of all the groups, as the Sun will drift unless you have a motor drive connected to your ’scope. Before concluding the observation, make sure that your recorded groups all sit accurately over the projected image of the groups when the Sun’s image is perfectly contained within your drawn 6-inch circle.
Now put the dust cap back on the telescope and make it safe. Take your drawing back to your desk and work out the sunspot positions. At this stage, draw the sunspots onto the paper containing the projected positions by referring to the detailed drawing that you made earlier whilst viewing the Sun directly.
 Once your spots are accurately recorded and drawn you will need to work out their positions. You need a set of Stonyhurst Disks which show where the solar equator is in relation to your position on the Earth at various times of the year. There are 8 charts in a set, which can be obtained from the BAA Solar Section or downloaded from the Section web pages. You will also need a copy of the current BAA Handbook, as you require the solar co-ordinates for each day. You will need to know angle P (the tilt of the Sun’s axis, + if east and – if west); angle B nought (B0, the latitude of the centre of the Sun’s disk indicating the tilt away or towards the Earth) and angle L nought (L0, the longitude of the centre of the disk or of the central meridian).

To calculate longitude, look at the value of angle L0. This will tell you what the longitude is on that date at the central meridian. You will probably have to make a slight adjustment for the time (given in the Handbook under ‘Decrease L0 with Time’ heading). Once the longitude of the central meridian has been established you can easily work out the longitude of groups on the disk by adding degrees for those west of the meridian and subtracting degrees east of the meridian.
An observation for a day recording 4 groups and 23 spots counted within those groups would be reported as R= 63 (4´10 + 23). If three groups were in the northern hemisphere and one in the south, g= 4; gn= 3; gs= 1.
Now you have observed the Sun directly and made a sketch; projected the image through a refractor; accurately recorded the groups and spots; worked out longitude and latitude and worked out a figure for R.
To submit your observations to the Solar Section, you need to record the date (always give the year first, then the month then the day); the time in Universal Time (same as the UK time in winter but you must subtract an hour in summer); the instrument(s) you have used; the Rotation Number (refer to the BAA Handbook for the RN for the date of your observation) and the observing conditions such as clear, boiling, haze, thin or drifting cloud etc. A code number for observing conditions can be applied: 1= clear, no limb motion; 2= small spots easily seen, slight motion at limb; 3= umbra/penumbra limit clear, limb motion boiling; 4= umbra/penumbra of large spots separable, some bad image and limb boiling, some drifting cloud; 5= large spots only seen, bad boiling or obscuring cloud, umbra/penumbra cannot be distinguished.
Hydrogen-Alpha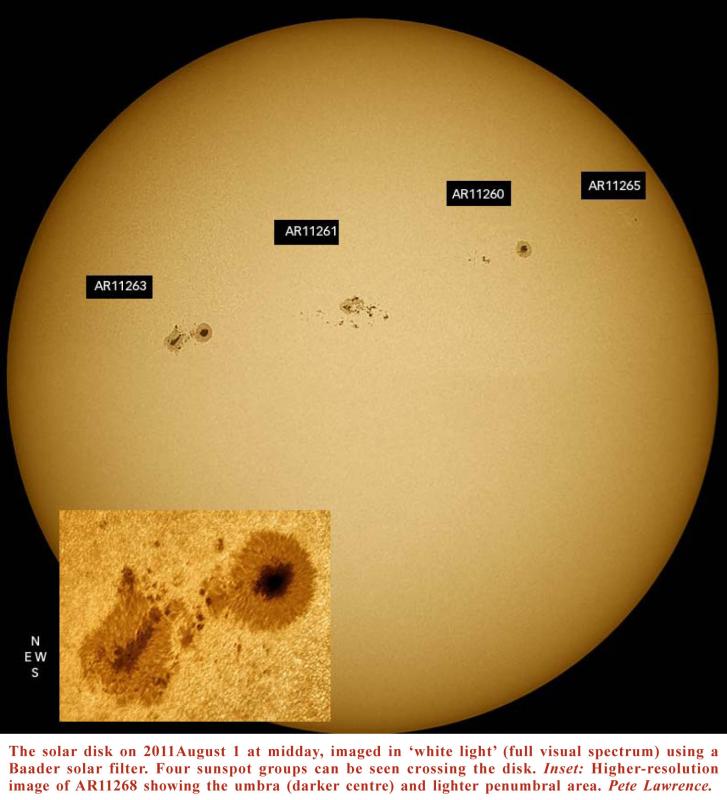 An H-alpha filter or specialised telescope lets you view the Sun in the restricted wavelength of ‘hydrogen-alpha’ light, greatly reducing the heat and light transmitted and enabling you to observe and report prominences, filaments and flares. Prominences are massive surges of plasma or superheated gas travelling along magnetic field lines, outwards from the limb of the Sun. They can appear as a variety of shapes often described by observers as mounds, trees or hedgerows, and can form arches, loops, spires or spicules. Some hover above the limb for days whilst others are attached and then can become detached from the limb and drift away into space.

The size of prominences varies considerably from the smallest spicule or mound to a spectacular eruptive prominence event that can reach to over a million km from the limb. For recording purposes the smallest prominences are not counted, i.e. those under 30 arcseconds in height (that equates to one-tenth of an inch on the scale of a 6-inch diameter disk solar drawing).
Also prominence activity should be expressed by the number of active areas (AAs) rather than individual prominences. The solar limb has been arbitrarily divided into 5º latitude zones, north and south i.e. 0° to 4.9°; 5° to 9.9°; 10° to 14.9° and so on. Each zone is regarded as an AA, so all qualifying prominences within that zone on a particular observing session/day would qualify as one event. A prominence has to be attached to the solar limb to be countable, so detached prominences, ejecta and hovering clouds are not counted. Also an eruptive prominence of short duration is not counted.
Filaments are seen in H-alpha as long dark winding strands across the solar disk. They are in fact prominences but seen against the disk rather than as bright shapes extending from the Sun’s limb. Sometimes a limb prominence can be seen looping away over the solar disk as a filament. Record a description and if possible location of the main filaments during the month; note them on your H-alpha monthly return.
Solar flares are sudden brightening of flocculus near an active sunspot group, becoming brilliant within a few minutes. The flare then fades more slowly than the sudden brightening. The whole event can be short-lived, 10 minutes or so, or extend for some hours. Activity can reoccur within an active region several times until activity dies down. Optical flares are recorded according to brightness: F= faint; N= normal; B= brilliant. They are also recorded under the heading ‘Importance’, referring to the extent of the flare at maximum brightness. S= subflare (area up to 2 square degrees); 1= area 2-5 sq deg.; 2= area 5-12 sq deg.; 3= 12-25 sq deg.; 4= area more than 25 sq degrees.
Solar observing can be highly rewarding and has the advantage of being available to the observer during sociable hours. You may even be able to take a small telescope to work and carry out a simple sunspot observation during lunch break, especially in the winter months. You’ll know you’re a ‘solar addict’ when you reach that stage!
Lyn Smith, Director of the Solar Section
Article originally published in the JBAA 122, 2, 2012
[To search for Solar observations uploaded by BAA members, follow this link to search the BAA Member Pages]
To return to the Solar Section home page. Please select Here
| The British Astronomical Association supports amateur astronomers around the UK and the rest of the world. Find out more about the BAA or join us. |