PHOTOMETRY
1.0 Introduction
Photometry is the measurement of the brightness of a celestial object. Measurements over a period of time can reveal, for example, the variation in magnitude of an asteroid. From such measurements its rotation rate can be calculated. Using an assumed value for its albedo the approximate diameter of an asteroid can also be calculated. The aim here is to describe a simple method, using a CCD camera that will lead to an estimate of the magnitude of the object under observation.
The magnitude of the target (V for Variable) is calculated by comparing it with a comparison star (C) of known magnitude. As a check and balance the magnitude of a third or check star (K) is also considered. The advantage of CCD photometry is that all three stars are in the same field of view and thus variations due to atmospheric changes can be ignored.
2.0 Theory
In simple terms each pixel on the CCD chip turns light (photons) in to electric current (electrons). Even in complete darkness each pixel will still produce some current. Subtracting an image of the same exposure taken with all light prevented from entering the camera (the dark frame) will compensate for this (see 3.2 below). Pixels are not entirely uniform in that some will produce more current for a given amount of light than others. The optical instrument will also cause variations in sensitivity across the chip (vignetting or dust shadows). To allow for this variation a short exposure is taken of a uniformly lit surface and the resulting image is called the flat field (see 3.1 below). The flat field must be corrected for bias by subtracting a dark frame obtained with the same exposure. The dark-subtracted image is then divided by the corrected flat-field to give a final calibrated image. In summary;
(Target Image – Dark Frame)/(Flat Field – Flat Dark) = Final Image used for photometry
3.0 Equipment
The method described here involves the use of;
- Orion 10” Newtonian Reflector on a Vixen GP German Equatorial Mount with a hand controller
- Starlight Xpress MX516 CCD camera
- Light Bin (for flat fields)
- Light tight cover for telescope tube (for dark frames)
- PIX_MX5 imaging software
- Megastar star charting software
- AIP4WIN image processing software
Your set up will most likely be very different but will need to include the above elements or the equivalent thereof. (My records tell me that it was at the time of this exercise, January 2001, that I suffered a slipped disc but its not that hard work - honest !)
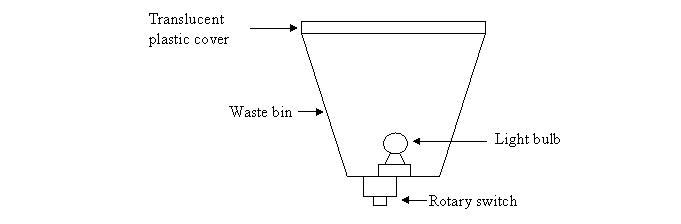
Flat fields can be produced in a number of ways eg; by imaging the sky at twilight or by using a light box positioned over the front of the telescope. The objective being to produce a low-level uniform light source.
My light box is a simple affair, see diagram below, constructed from a plastic waste paper bin hence – light bin.
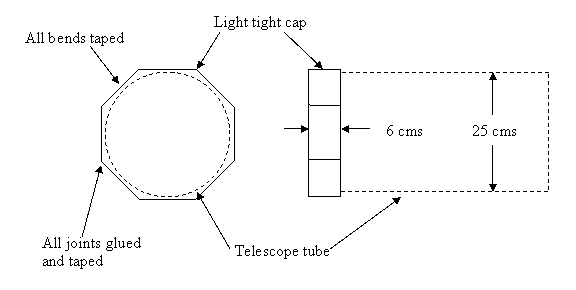
Two sets of dark frames need to be taken as listed in 5.0 below. To avoid having to remove the camera from the telescope a light tight cap can be fitted over the end of the telescope tube. Mine is made from thick card as shown in the diagram below.
4.0
Target
The target for this experiment was the magnitude 10 asteroid
16 Pysche (discovered on
5.0 Imaging
Using FITS format for images has some advantages eg; the asteroid name and number can be stored in the header and software packages such as Pix_M5 will automatically store the time and duration of the exposure. Image processing packages may also store the processing history to give you a complete record for any particular image.
Before obtaining the asteroid images listed below a test image was taken to ensure that the images used for the actual photometry were not over exposed and the measurements thus rendered inaccurate. The STAR_M5 software includes a histogram feature which plots the output of the pixels a row at a time or in a 3D format. Using this feature it is quite easy to see if any pixel is close to saturation. The same feature can be used to check the dark frames and flat fields to ensure nothing has gone astray.
Note that the flat fields must be taken with the camera in exactly the same position as when imaging the asteroid.
The following images were obtained in the sequence as listed below;
|
Image Type |
Number of images |
Exposure time |
Comments |
|
Asteroid |
4 |
20 secs |
Max pixel intensity must be no more than 50% |
|
Flat field |
4 |
1 sec |
Pixel intensity approximately 50% maximum |
|
Dark frame |
4 |
20 secs |
Same exposure time as for asteroid |
|
Flat dark |
4 |
1 sec |
Same exposure time as for Flat field |
Limiting the pixel intensity to 50% of maximum should ensure that the CCD camera is working over the linear portion of its response curve.
Although this may sound a little complicated a software package, such as AIP4WIN, will enable the process to be completed without too much trouble.
Step 1) Median combine the Dark Frames = Dark Master
Step 2) Ditto the Flat Fields = Flat Master
Step 3) Ditto the Flat Darks = Flat Dark Master
Step 4) Subtract the Flat Dark Master from the Flat Master = Corrected Flat Master
Step 5) Subtract the Dark Master from one of the Asteroid Images = Asteroid - Dark
Step 6) Apply the Corrected Flat Master to the (Asteroid – Dark) image = Image Master
The resulting image is shown below (The names and numbers were added later I hasten to say !).

7.0 Measurement
The magnitude of the asteroid can be measured quite easily using any one of a number of commercially available software packages.
The results, using AIP4WIN, are shown in the table below. The figure in the ‘Magnitude difference’ column is the difference between the magnitudes of the comparison star and the asteroid. Star 6 could not be used as AIP4WIN indicated that it was not suitable for photometry. The benefit of using several comparison stars is that it highlights any discrepancies and is thus more likely to give an accurate result.
|
Star |
|
Asteroid |
||
|
Comparison |
Check |
Magnitude of Comparison star |
Magnitude difference |
Calculated |
|
1 |
7 |
14.2 |
-4.2 |
10.0 |
|
2 |
7 |
14.4 |
-4.4 |
10.0 |
|
3 |
7 |
14.0 |
-4.0 |
10.0 |
|
4 |
7 |
13.1 |
-3.1 |
10.0 |
|
5 |
7 |
12.1 |
-2.1 |
10.0 |
|
6 |
|
|
|
|
|
7 |
5 |
13.2 |
-3.3 |
9.9 |
The magnitudes of the comparison stars are taken from the Hubble Guide Star Catalogue and are only accurate to +/- 0.3 magnitudes. The calculated magnitude of the asteroid is thus 10.0 +/- 0.3. The magnitude of the asteroid as given by Megastar was 10.3 which compares well with the calculated value. If more accurate values for the comparison stars (such as those in the Tycho catalogue) are available then it is possible for a more accurate value for the magnitude of the asteroid to be obtained.
8.0 Conclusion
I hope that you will now try your hand at photometry, realizing that it’s not such a black art after all. Having got this far you will probably want to strive for more accurate results. The books mentioned in the ‘Tools and Techniques’ section on the ‘Books’ page should help to satisfy any desires you might have in this direction.
My thanks to Nick James for his help with this document.