ASTROMETRY OF NEAR
EARTH OBJECTS – FO
Please note that this document is the result of combining two earlier documents on this web site and therefore the examples used do refer to different asteroids. The reason for doing this is to pass on experience gained in the past year or so and to simplify some of the original procedures.
1.0
Introduction
Imaging faint objects is, in very simple terms, a matter of a long enough exposure be it with a CCD or film camera. Faint Near Earth Asteroids present the observer with two additional problems;
- they are fast moving
- you can’t see them either visually or on a single CCD image
(In comparison supernova hunters have a much easier time – those things shine so brightly that it must be a bit like a film premiere with the camera flashes firing off as the stars arrive – only joking guys !)
This document describes how to find a suitable target for follow-up observations, ascertain the position(s) of the asteroid (astrometry) using Astrometrica and then submit the results to the Minor Planet Center. One can use the MPC NEO Confirmation Page as a source of potential targets but my set-up is not capable of reaching down to the faint magnitudes (usually) of these objects. The orbit of objects on the NEO Confirmation Page is, by definition, not yet well defined. On the couple of occasions I have tried to image these asteroids I failed due to the actual track falling well outside my 12 x 8 arc sec field of view.
‘A practical guide on how to observe NEOCP objects’ by
Sergio Foglia,
The Minor Planet Center has a facility which can be used to determine the probabilities that your observations belong to NEOs. At least two observations of each object must be entered ensuring that each observation has the same designation and that all observations are formatted correctly.
2.0
Theory
The matrix of pixels accumulating photons in a CCD camera can be compared to a similar matrix of buckets catching rainwater in a field. The more rain that falls, the more water there is in the buckets and, likewise, the longer your exposure the brighter will be the object on the image.
Now imagine a very small rain cloud moving so quickly across the field that it deposits only a few drops of water in each bucket. You could run after it with your bucket and collect more water but, if you can’t see it and therefore don’t know where it started from or its speed and direction you are somewhat scuppered. However, if by some magic, you could ascertain its initial whereabouts and subsequent motion you would be (continuing with the agricultural theme) in clover.
That ‘magic’ is the internet and the sites it enables you to
access. Inserting the relevant parameters in to Astrometrica
(
3.0
Equipment
My current set-up includes;
Telescope and accessories
- Orion 10” Newtonian reflector on a Vixen GP German Equatorial Mount
- Skysensor hand controller
- Starlight Xpress MX516 CCD camera
-
-
Observatory laptop PC and accessories
- Astroart imaging software
- Megastar software for star charting and telescope control
- TAC 32 software (for handling GPS input)
- Garmin eTrex Venture GPS receiver (for accurate timekeeping)
- D-Link Xtreme G 2.4GHz Wireless Cardbus Adapter
- Radmin software (for handling wireless link to PC)
Study desktop PC
- Astrometrica (using the on-line USNO-B 1.0 star catalogue)
- AIP4WIN (for generating master dark frames and flatfields)
- Guide for plotting astrometry results
- D-Link Xtreme G 2.4GHz Wireless Router
- Radmin software (for handling wireless link to PC)
- Megastar software for star charting and telescope control
4.0 Target selection
4.1 Overview
Try the brighter asteroids first and then go fainter to see
just what you can achieve. Then, having proved your equipment and procedures,
you can move on to follow-up observations and discovery !
In summary;
-
decide which area of
sky is suitable for observing
-
check the approximate
RA and Declination of that area for the period of observation
-
choose a target using
the web sites described below
-
obtain orbital elements
and an ephemeris from the Minor Planet Centre
-
plot the track of the
target using a star charting software package such as Megastar and verify against the MPC ephemeris
4.2
4.2.1
The Spaceguard’s Priority List. can be accessed directly or by
following the links from the Spaceguard Foundations
homepage via the Spaceguard
Central Node, the Spaceguard System and the NEO
Coordination System web pages.
I start with the Priority
I found it useful to sort the list
by RA having first established, using a planisphere,
which area of the heavens was best placed at the time I intended to observe –
in this case 17 - 19h RA. Arranging the list by RA to start at 17h gave the
following results (portion of list only);
|
Priority |
Object |
Inserted in this categ. |
R.A. |
Decl. |
Elong. |
Magn. |
Sky Uncert. in arcsec |
End of Visibility |
|
|
Data for 2002 Jul 18, 0:00 UT |
|
||||||
|
NE |
2002 Jul 9 |
17h 07m |
-14.6 |
141 |
21.7 |
2 |
2002 Jul 29 |
|
|
NE |
2002 Jul 17 |
17h 07m |
-06.1 |
138 |
20.2 |
1 |
2002 Aug 25 |
|
|
NE |
2002 Jul 14 |
17h 52m |
-23.2 |
153 |
19.6 |
2 |
2002 Aug 12 |
|
|
NE |
2002 Jul 15 |
18h 30m |
+15.8 |
138 |
17.7 |
2 |
2002 Aug 30 |
|
|
US |
2002 Jul 10 |
18h 49m |
+06.4 |
149 |
19.2 |
2 |
2002 Oct 11 |
|
|
US |
2002 Jul 15 |
19h 27m |
-05.4 |
164 |
18.1 |
4 |
2002 Oct 7 |
|
|
NE |
2002 Jun 20 |
19h 29m |
-24.7 |
174 |
20.9 |
1 |
2002 Jul 30 |
|
|
NE |
2002 Jul 15 |
19h 44m |
-44.2 |
157 |
17.4 |
4 |
2002 Nov 8 |
|
From the above list I selected
2002 NV16 as a suitable target, it being in the right area of sky and of a
magnitude, I knew from previous experience, I could successfully image.
4.2.2 Orbits
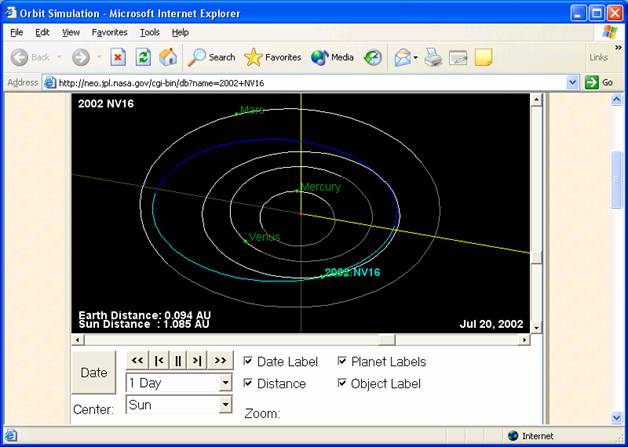
Following the links to the JPL NEO
Program site produces an orbit
diagram, shown below, which can be manipulated using the slider bars to the
right of and below the diagram. The data listed shows this asteroid to be an
Apollo type, perihelion
<= 1.0167 au and semi major axis >= 2 au. As the diagram shows, this type of asteroid spends most of
its time outside the Earth’s orbit but just dipping inside around perihelion.
4.2.3 Orbital Elements
To be able to point the telescope in the right direction in
order to image the asteroid one needs to know its position and motion extremely
accurately. Such data is available from the
The MPC’s
Ephemeris Service yielded the
following data for 2002 NV16 (portion of table shown). When completing the form
select the ‘MPC 8
Minor Planet Ephemeris Service: Query Results
Below
are the results of your request from the
2002 NV16
Epoch 2002 Nov. 22.0 TT = JDT 2452600.5 MPCM 44.04520 (2000.0) P Qn 0.71562296 Peri. 179.32679 +0.99867012 -0.05141017a 1.2378838 Node 183.62690 +0.04701083 +0.93888971e 0.2202507 Incl. 3.50877 +0.02116544 +0.34035732
P 1.38 H 21.4 G 0.15 U 6
From 203 observations 2002 July 13-Aug. 14, mean residual 0".53.
Last observed on 2002 Aug. 14. Elements from MPO 35583.
Further observations? PHA : None needed at this time. Desirable between 2002 Sept. 13-Nov. 2. At the first date, object will be within 60 deg of the sun.
K02N16VDate UT R.A. (J2000) Decl. Delta r El. Ph. V Sky Motion Object Sun "/min P.A. Azi. Alt. Alt.2002 07 17 21 18 30.61 +15 45.6 0.099 1.092 138.5 38.0 18.1 2.24 329.3 317 +48 -72002 07 17 22 18 30.52 +15 47.5 0.099 1.092 138.5 38.1 18.1 2.24 328.5 338 +54 -132002 07 17 23 18 30.44 +15 49.4 0.099 1.092 138.4 38.1 18.1 2.23 328.2 003 +55 -17 4.2.4 Plotting the track
To confirm that the asteroid is actually where you think it
is it’s a good idea to cross check the track as determined by, say, Megastar, with the MPC ephemeris as listed 3.1 above.
I would then display the Megastar chart on my observatory
laptop and compare it with CCD images to verify that the required field was
being imaged.
The other piece of information I needed for the Track and Stack feature in Astrometrica was the motion of the asteroid in terms of direction or position angle (degrees) and rate (arc seconds per minute). This is listed in the MPC data shown above.
4.2.5 Checking
for other asteroids
It is also worthwhile checking to see if there are any other asteroids in the vicinity by using the MPC’s MPChecker facility. An example of the output obtained is shown below. This data can also be used as a rough check on the accuracy of ones own astrometry as mentioned in para 7.0 below.
MPChecker
Here are the results of your search(es) in the requested field(s):
The following minor planets, brighter than V = 19.0,
were found in the 15.0-arcminute region around R.A. = 09 35 45, Decl. = +35 14 13 (J2000.0) on 2002 04 16.89 UT:
Object designation R.A. Decl. V Offsets Motion/min (38071) 1999 GU3 09 35 43.1 +35 13 34 16.7 0.4W 0.6S 5.7+ 7.4+
The following minor planets, brighter than V = 19.0,
were found in the 15.0-arcminute region around R.A. = 09 35 45, Decl. = +35 14 13 (J2000.0) on 2002 04 16.90 UT:
Object designation R.A. Decl. V Offsets Motion/min (38071) 1999 GU3 09 35 49.8 +35 15 20 16.7 1.0E 1.1N 5.7+ 7.4+
4.3
Potential targets can also be identified using Lowell Observatory’s Asteroid Services ie; Hierarchical
Observation Protocol and Critical List
of Asteroids
4..4.
4.4.1 Services for Observers
The MPC’s ‘Services for
Observers’ includes Date of
As an example the following settings were input on the
‘Date of
These produced the following list of targets;
1988 NE
2005 JF21
2000 NF11
2000 KO44
2002 EX12
4.4.2 Orbital Elements
Of these 2002 EX12 appeared to be well placed and
relatively bright so elements and an ephemeris were obtained using the MPC’s Minor Planet and Comet
Ephemeris Service
Minor Planet Ephemeris Service: Query Results
Below
are the results of your request from the
2002 EX12
Epoch 2005 Aug. 18.0 TT = JDT 2453600.5 MPCM 352.76090 (2000.0) P Qn 0.23458425 Peri. 217.92735 +0.82655784 -0.56270508a 2.6037752 Node 176.24614 +0.55239277 +0.80660649e 0.7675194 Incl. 11.31892 +0.10800168 +0.18096674
P 4.20 H 15.9 G 0.15 U 2
4.4.3 Plotting the track
This information could then be used to plot the projected
track in Megastar.
4.4.4 Checking
for other asteroids
It is also worthwhile checking to see if there are any other asteroids in the vicinity as in 4.2.5 above.
4.5 Italian Organisation
of Minor Planet
Observers
Follow-up Astrometric
Program. Add further information when
this item is updated for the ARPS handbook.
5.0 Imaging
5.1 Setting
up the telescope
Correct set-up is all important for accurate astrometry. Some tips;
- ensure the PC clock keeps good time (to the nearest second)
- ensure your telescope is correctly polar aligned (to avoid trailing on the images)
- focus your telescope (to obtain sharp images)
- set the exposure time to avoid trailing and saturating pixels
Because the asteroid will not be visible the telescope needs to be aligned on the star field containing the asteroid. Having input the orbital elements in to my laptop computer I plot the path of the asteroid for the time I would be at the telescope – see Megastar chart above. Once the telescope has been polar and three point aligned I use the telescope control feature in Megastar to position the telescope on the target.
5.2 Acquiring
images
Having eyeballed the field to ensure I am actually where I want to be I use the frowned-on method of removing the eyepiece and replacing it with the CCD camera oriented so that the CCD image is the same as that in the eyepiece ie; north up. You do have to be careful not to move the telescope while doing so but this has only happened to me once so far. I then make any fine adjustments necessary to ensure that the images look reasonable and that the asteroid tracks across the centre of the field of view while the images are being acquired (having said that I usually finish up with the thing on the edge of the image !)
In his article, Astrometry of Near Earth Objects, Stephen Laurie quotes the following formula;
Exposure time (mins) = FWHM of star image (arc secs)/rate of motion of asteroid (arc secs/min)
Astrometrica can be used to calculate the FWHM for a typical star on any given image.
In the case of 2002 NV16 the maximum exposure time = 4/2.24 = 1 min 47 secs. If I was using a guider such as the Starlight Xpress S*T*A*R 2000 I might be tempted to use this exposure time but experience suggests 1 min max to avoid trailing (assuming saturation is not a problem).
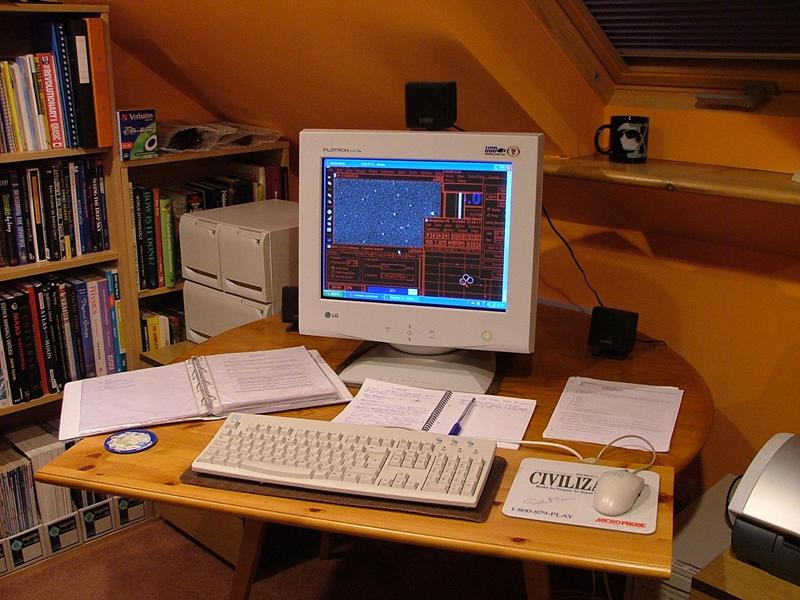
5.3 In
from the cold !
Once I have acquired the first few images and checked that all is working as it should I retire to the warmth of my study and monitor proceedings using a desktop PC (shown below) with a wireless link to the laptop PC in the observatory. The observatory laptop screen, keyboard and mouse are replicated on the desktop PC enabling imaging and the telescope to be controlled in comfort.
NEO’s move quite quickly in comparison to main belt asteroids and thus it is necessary to occasionally reposition the telescope along the predicted track of the NEO. I try and position the telescope so that the NEO remains in the same field of view for as long as possible. This maximizes the number of images that can be obtained in that one position and ensures that I have enough for Astrometrica to track and stack and bring the NEO in to view.
6.0 Image
processing
6.1
Calibration
I use AIP4WIN to create master dark frames and flat fields ie;
a) Median combine the dark frames = Dark Master
b) Ditto the Flat Fields = Flat Master
c) Ditto the Flat Darks = Flat Dark Master
d) Subtract the Flat Dark Master from the Flat Master = Corrected Flat Master
e) Save the dark and flat masters
6.2
Track and
Stack
To
quote from Astrometrica , Tutorial III, ‘Astrometrica can also be used to stack a number of images,
adding up the signal of a faint object. When stacking images, the images can be
shifted to compensate for the motion of an object (asteroid or comet), which
will enable the user to get reliable positions even for very faint objects (so
that the object cannot be captured in a single short exposure), or fast moving
objects (that would trail in a single, longer exposure)’. I would also make the
point that some objects cannot be imaged with a single long exposure as they
are too faint/moving too fast to leave a trail.
If
the stacked images are still slightly trailed then use the facility in Astrometrica to slightly vary the motion rate and PA to see
if the image can be improved. I look for the highest value of Signal to Noise
Ratio (SNR), low FWHM and Fit
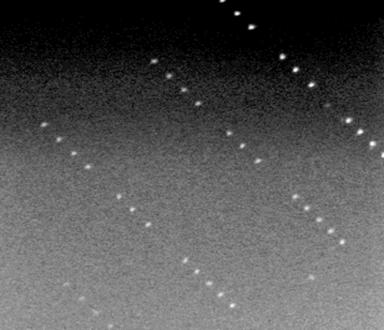
A single (calibrated) image typical of those obtained is shown below.
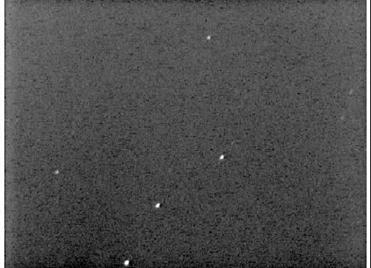
Stacking 12 images produced the following image. The stars are shown as a line of points each offset from the other as determined by the rate of motion and position angle as input to Astrometrica. The asteroid, 1999 GU3, is the single point in the bottom right hand corner of the image.
7.0 Checking
astrometry
7.1 Using
the MPC MPChecker
It is well worthwhile checking ones results to ensure they are reasonably close to the predicted position.
To get values for RA and Dec I use the MPC MPChecker facility as described in para 4.4 above. In this instance the RA and Dec listed in the MPC report in para 8 below lies between the RA and Dec values obtained from the MPChecker for times of 2002 04 16.89 and 2002 04 16.90 and therefore I could be reasonably confident as to the accuracy of my measurements.
7.2 Using
Guide
I
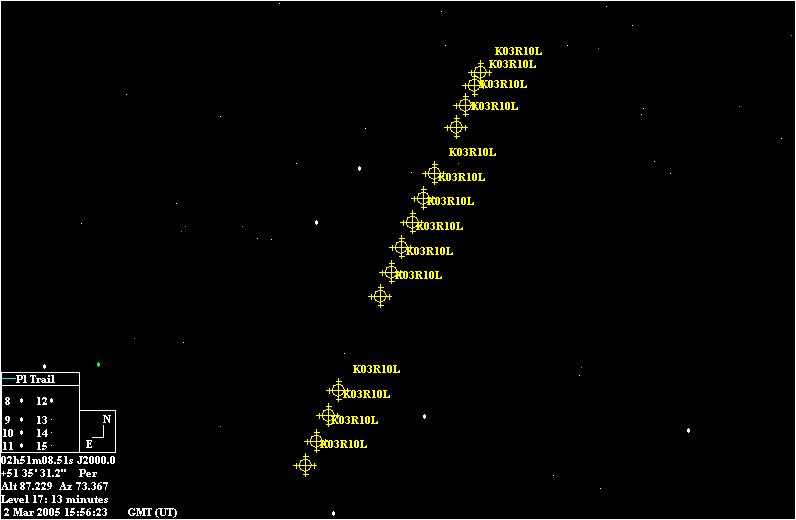
load my astrometric measurements in to Guide.
Assuming that the images have been obtained at regular intervals the plot
(below) will show a straight line of equally spaced positions (the gaps are due
to some images being rejected prior to processing). The designation K03R10
7.3 Using
FindOrb
There were a number of postings on the Minor Planet Mailing
List in autumn 2007 concerning the use of the measurement of residuals to
verify the accuracy of ones astrometry prior to submission to the MPC. I asked
‘I like
to ensure I don't have any gross errors in the astrometry, e.g. by mistake a
close star has been measured instead of the intended object etc., so I aim to
try and make sure my positions are internally consistent, so RA and Dec flow
evenly against the times of observation.
I used to
do this by plotting RA against time and Dec against time in Excel but it is not
always easy to spot a discordant position like that, especially when there is a
reasonable amount of time between observations or the object is moving
relatively fast.
The
easiest, quickest way I find now is to bring the positions up in FindOrb (which can be found at at http://www.projectpluto.com/find_orb.htm). Using its Vaisala
orbit option it will fit three or more positions making assumptions about the
orbit that may well make the resulting orbit complete fiction, but that doesn't
matter, it will have done a least squares fitting of the positions and displays
the residuals directly. You can then easily see whether there are any big problems
within the set of positions, though it is not always obvious which positions
are good and which are bad.
If it
does look like there could be a problem then I might re-examine the images to
make sure I had identified the object correctly, or re-measure the object to
make sure that the centre of light was properly registered during measurement
(it's surprisingly easy using Astrometrica to click
on an object and get the annulus *not* centred on the
object - the resulting PSF curve is always distinctively 'wrong' in those cases
but not always noticed...).
Alternatively,
comparing against ephemerides should give you
consistent *trends* in the residuals but only to as good a precision as the
ephemeris, made worse by the inaccuracies in interpolation. So the residuals
might be physically large (if the ephemeris was calculated from an orbit from
relatively old observations) but the run in those residuals ought to be smooth.
As it is so much easier to run up a Vaisala orbit in FindOrb I would only resort to the extra effort in
comparing against an ephemeris if for instance I had only been able to get two
positions of an object’.
8.0 MPC
Reporting
Astrometrica then allows the position of the asteroid to be determined and produces a report, shown below, in the correct format for sending to the Minor Planet Centre (assuming the correct data has been input using File/Settings). Additional data is recorded in the Log file. Please note that no more than 3-5 observations per object per night should be reported to the MPC.
--------------------------------------------------------------------------------------------------------------
COD 940
CON
CON [roger.dymock@ntlworld.com]
OBS
MEA
NET USNO-A2.0
TE
ACK MPCReport file updated 2002.06.27 16:36:53
J99G03U C2002 04 16.89207 09 35 45.25 +35 14 12.9 16.9 V 940
----------------------------------------------------------------------------------
J99G03U is the packed designation for 1999 GU3
The day after submitting my results I check the MPC Electronic Circulars and data for my observatory in the NeoDys observatory list to see if my observations have been accepted.
9.0 Conclusion
There is probably as much if not more computer work than actual observing in all of this. However since we get far more cloudy nights than clear ones at least you will have something to occupy your time with when you can’t get outside !